Pintrest

Sunday, March 17, 2013

To Rework or Not To Rework, that is the question....

I've mentioned before that this layout is based on the Atlas Atlantic Longhaul Lines and I read somewhere that John Sheridan (probably one of the foremost noted experts on model railroad layouts) had input in the design.  In the notched area, things were bent fairly tight.  The locos made their way around pretty well but there was an occasional disagreement as they tracked through the turnout heading into the reversing loop.

While installing my last turnout servo I managed to burn it out.  Great.  I went to the local chain hobby store and they had the same servo for $17.99, which I could get online for $3.95.  I'm all for supporting the local shops but that was a little ridiculous.  I went ahead and ordered a replacement online (along with a spare) which provided me with some down time in construction.

Here's the area that just wasn't tracking (OK - I know I've used that pun before but it works!):
Turnout 2 on the left and turnout 3 on the right - connected with an 11" radius
Fortunately, I still had some spare track pieces and I decided to look at some options for this area.  After some trial and error, I found what looked to be a much smoother solution:
Rework concept for the "Notch" area
So after several reworks, Sheila pointed out that the locos were working fine through that area so why mess with it?  Well, I knew it just didn't feel right.  So, earlier today the Yorktown M & S had a little demolition work take place:
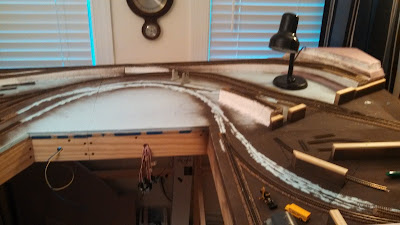
Demo areas are the blue foam showing through the brown background
Demolition required the removal of two turnout servos, two power feeders and about 8' of previously "ready to go" track.  All in all, I think it was a good decision and things will ultimately run smoother.

More lessons learned - mostly the hard way.....


Should 9.75" radius curve pieces be outlawed?

Another novice layout mistake - using 9.75" radius curves.  I knew they could be "difficult" so I  limited the number I used on the layout.  My first two locos were a Kato C30-7 Santa Fe (love this loco) and  Bachmann EMD DD40AX.  The DD40 was a great price and came with DCC included.  What my novice N Scale self didn't realize is this thing was a monster - nearly a foot long!!!!  My next loco was a Kato SD40-2 BNSF, which was also sweet looking.  Here's a comparison of the three locos side-by-side:
I sold the Bachmann on Ebay and broke even - no loss, so that's good.  It was a good loco but not for my layout.  Now, back to the dreaded 9.75" radius curves.....

The reversing loop, which will be hidden under the upper deck, was about half 11" radius and half 9.75" radius.  The Santa Fe C30 tracked around it with no problems.  The SD40 - it was another issue.  That bad boy WOULD NOT stop derailing on that loop.  I knew that something had to happen so I pulled up the loop and re-installed it, with a little easier curve.  Again - SD40 derailed.  I rebuilt it a total of three times before I finally was able to get the SD40 around, in forward & reverse, at full speed.  I know the locos will never run at full speed but I had to be sure that things would track (pun intended) once the upper deck "lid" was in place.  Here's a view of the loop in question being reworked:
Problem reversing loop with Sheila's school bus and backhoe shown.
In follow up research I learned that 3X a car length should be the minimum radius used & 5X is best.  Now it makes sense, 40' boxcars are 3.25" long.  Use the 3X factor and yu end up with the 9.75" radius.

I know that the 9.75" radius pieces have a place - but in the future, it that place won't be on my layouts!


Living on the Edge - Not Good

Been away for awhile but mostly due to job and work on the layout.  Today's lesson - living on the edge isn't always a good thing ........

I was moving along really well on the servo installations and had the upper deck servo installed and moved on to the areas along the far left side and back of the layout.  This required a little move of some room furniture as well as pulling the layout away from the wall.  Things seemed to be really rocking along until it came to the two servos for the turnouts along the back of the layout.  Atlas had the back track about an inch from the edge of the layout.  I followed suit and felt like I had made good use of all the layout board real estate.I drilled the holes for the turnout actuator wires and was glad they missed the edge framing of the layout ...... or so I thought.

One note about the servos controlling the turnouts.  The servo needs to be perpendicular to track so that when the actuator wire moves from side-to-side, the turnout will likewise move from side to side.  When I started to install the servos, I realized that there wasn't enough clearance for the servo mounting bracket.  I pondered that for a few minutes, looked at options and realized I had no choice - I had to cut clearance holes in the outer edge frame of the layout!!!!!
Ugly I know, but it was a tough job to actually get in here an get the hole cut.
View from under the layout.
So - living on the edge didn't turn out so well. Fortunately, and it's a lame excuse, I'm the only one who knows the ugliness is there.  The back edge is against the wall and will always be, even when the layout moves someday.

Ironically, Living on the Edge is my cellphone ting tone - no joke........