Pintrest

Sunday, February 9, 2014

Enough Design - Time to Start Building

Well after what seems to be a few months of on and off design work, I think I have made it to the point where I'm ready to work out the L Girder bench work and start cutting some lumber.  I thought I had everything pretty much worked out, only to realize today that the hidden track under the town really doesn't have enough clearance to be hidden.  At first, I thought I would back up and do some more design work.  The more I thought about it, the more I decided that I had spent enough time designing.  I'm ready to start building and actually be able to run some trains!  After all, once I get the girder work in and set the risers, I'll have a better sense of things once the girders are in and I get the risers in place.  So here's the current design:


One other interesting discovery was in a bunch of old Model Railroader magazines I recently found online.  I was looking through the April 1957 issue and came across the original John Armstrong article that had the beginnings of this layout design.  This is the first time I have actually seen a good quality resolution of the original layout:


Thursday, December 26, 2013

Lurking (and Posting) = Learning

I've posted a few layout concepts on the N Scale Net Layout Forum (http://www.nscale.net/forums/forumdisplay.php?108-Layouts-Design-amp-Planning), received some great advice and continue to grind through my paralysis of analysis. After my last layout posted and received great feedback, I did some more looking and discovered the Adirondack RR (#62) in the 101 Track Plans book. I looked and figured that it could really come closer to give me what I was hoping to accomplish - watch multiple trains run, do some low level operations, operate a small yard (mostly fiddle) and have some opportunities for some key layout design elements. I looked and I looked - yup, I think I might be there. I have learned that the reduction from HO down to N is absolutely not 1/2 as most books recommend. It's also not the mathematical .54375 which is what you get when you divide 160 by 87. Nope, I use .75 (which the books use for TT scale) to be safe. So, as I kept working this plan, something kept nagging at the back of my mid. What was it? I had seen comments before that related to my nagging thoughts but couldn't really focus. Then it hit me - the REACH POLICE!!! 

Not good. I quickly did some mock ups on top of my wife's sewing layout table to get to a simulated 42" deck height. Then, using her small step stool, I determined that I could get away with a 36" maximum reach, although I knew that was against a LOT of recommendations. I grabbed a scale and started looking at my break through layout - DISASTER!!! I have major reach issues in two locations. The layout would be against the wall on the top and left sides. No way this is ever going to work. Just when I thought I was nearly close to developing the plan and cutting some lumber. 

Here' the reach dead zones:

Well, as the title says, lurking is learning. 

Speaking of mock ups, when I was conducting my little reach simulation my wife was observing and asked, "So how big is your layout going to be?" One of the must haves for our new home was a train room and the FROG is all mine. In addition to the layout, I also have my desk, a couple of rolling file cabinets (mostly hobby supplies), my hobby table and a bookshelf (train books) in the room. All that means that I really don't have as much floor area as the entire 13'-6" x 14'-8" space. I had always figured about 10'-6" max width (which still affords access to the room's closet) and about 8' max on one leg with 9'-10' max on the other leg of a U-Shaped layout. I really loved what Steve Miazga did with his Missabe Junction layout (see November 2013 Model Railroader) and foolishly thought I could change his 12" grid to a 9" grid, tighten the curves and make it work for me. I had just sketched out the footprint of the benchwork outline when my wife asked me that question. Here's Steve's layout:


With her help, we grabbed some of our empty Christmas decoration boxes and proceeded to basically mock up, at 1:1 scale, what I had envisioned as my layout area. Well guess what - way too big, way too claustrophobic and would leave me with no real way to do anything other than squeeze past a layout. As the saying goes - back to the drawing board. 

A long rambling post directed at two groups: 1. To all you lurkers out there - keep lurking, reading and learning. It sinks in and it really pays off. 2. To all the really great folks out there who have provided input and their expertise - THANK YOU!!! Folks like WP&P, ChicagoNW, OTFan & countless others, y'all are helping a lot of newbies like me learn and avoid costly mistakes. 

When I posted this on N Scale Net, a couple of the folks mentioned above pointed out that without posting, or getting feedback, there's not a lot of learning.  Great point.  Sure you have to be receptive to constructive criticism (I'm an architect - we live by it) and I've never received a snide or condescending reply to anything I've ever posted on that site.

Back to the drawing board working with a reduced footprint and more of a L Shape.

Sunday, November 24, 2013

Finally Back - Now the power plant can't get its coal shipment

So I've been fairly scarce for the last three months or so, but I have been working on the new layout.  Sheila & I closed on our home at the end of August, moved in at the end of September and have been living our own version of HGTV since August.  The great news is the new home has a FROG that will be solely used for the "Train Room"  It's about 13'-6" wide and about 14'-8" long.  Since I'm going to have a desk and hobby work bench, along with the built-in storage closet, I have figured that a U-Shape with one 8' leg, one 9' leg and 10' wide will work well.  I have had a lot of help from TXTrainGuy (Tom Wright) some great help from David K. Smith (White River & Northern) and some input from Byron Henderson (Layout Vision) - I final have a pretty decent direction.  At least I thought I did, until I realized that the power plant cannot actually receive any coal from the coal mine.  I have been looking at this plan for awhile and fighting my analysis paralysis (I was an architect for years) so I thought I'd post where I am to the N Scale Net Layout Forum for some guidance and suggestions.  Since I haven't updated the blog in a long time, I thought I'd update with the same post here.

At this point, the elevations haven't been worked out, other than conceptually in my head.  I'm using AnyRail (great product) and haven't started setting track height.  I'm using Atlas Code 80 and predominantly #4 turnouts, since I already own a large quantity of track pieces and about 40 turnouts.  I used the #4's on my last layout (with servo control) and didn't have any issues.  This layout has eliminated the vile 9.75" radius curves with 11" set as the minimum.  I have included a reversing loop since I have the Digitrax AR1 and like being able to switch direction while running.

Glad to be back & finally have some forward momentum on the new layout.


Sunday, June 30, 2013

No - I haven't disappeared!!

Been quite awhile since I posted but that doesn't mean there hasn't been progress.  I've been pretty short on layout time recently but I have managed to get the control panel roughed in, with all the control switches:


It still needs a little work to get it to the finished product but it is a great addition and makes controlling the routes MUCH easier!  The close up below shows the red/green lights on the track schematic that indicate which route is open.  Simple to just throw a switch as a loco is making its way around the layout.


Speaking of locos - here's the latest addition.  Thanks to Sheila for my Father's Day present of the infamous "Vomit Bonnet"!!!


Finally, Sheila & I took a weekend getaway to New Bern, NC & I managed to sneak in a little 1:1 scale train view.  Here's the benefit of that quick stop:

Those stairs were awfully tempting but I opted to avoid a trespassing charge!

Stay tuned, more to come later on down the road!

Sunday, March 17, 2013

To Rework or Not To Rework, that is the question....

I've mentioned before that this layout is based on the Atlas Atlantic Longhaul Lines and I read somewhere that John Sheridan (probably one of the foremost noted experts on model railroad layouts) had input in the design.  In the notched area, things were bent fairly tight.  The locos made their way around pretty well but there was an occasional disagreement as they tracked through the turnout heading into the reversing loop.

While installing my last turnout servo I managed to burn it out.  Great.  I went to the local chain hobby store and they had the same servo for $17.99, which I could get online for $3.95.  I'm all for supporting the local shops but that was a little ridiculous.  I went ahead and ordered a replacement online (along with a spare) which provided me with some down time in construction.

Here's the area that just wasn't tracking (OK - I know I've used that pun before but it works!):
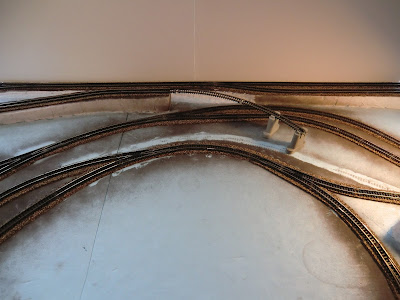
Turnout 2 on the left and turnout 3 on the right - connected with an 11" radius
Fortunately, I still had some spare track pieces and I decided to look at some options for this area.  After some trial and error, I found what looked to be a much smoother solution:
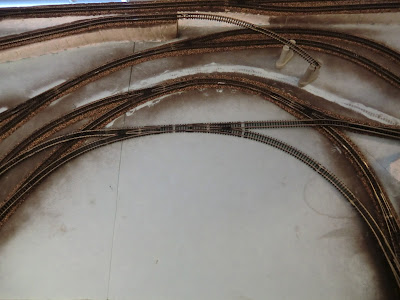
Rework concept for the "Notch" area
So after several reworks, Sheila pointed out that the locos were working fine through that area so why mess with it?  Well, I knew it just didn't feel right.  So, earlier today the Yorktown M & S had a little demolition work take place:
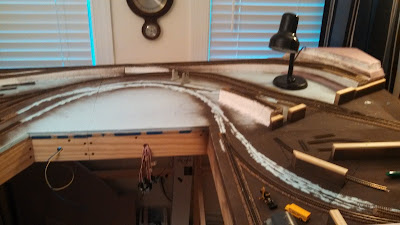
Demo areas are the blue foam showing through the brown background
Demolition required the removal of two turnout servos, two power feeders and about 8' of previously "ready to go" track.  All in all, I think it was a good decision and things will ultimately run smoother.

More lessons learned - mostly the hard way.....


Should 9.75" radius curve pieces be outlawed?

Another novice layout mistake - using 9.75" radius curves.  I knew they could be "difficult" so I  limited the number I used on the layout.  My first two locos were a Kato C30-7 Santa Fe (love this loco) and  Bachmann EMD DD40AX.  The DD40 was a great price and came with DCC included.  What my novice N Scale self didn't realize is this thing was a monster - nearly a foot long!!!!  My next loco was a Kato SD40-2 BNSF, which was also sweet looking.  Here's a comparison of the three locos side-by-side:
I sold the Bachmann on Ebay and broke even - no loss, so that's good.  It was a good loco but not for my layout.  Now, back to the dreaded 9.75" radius curves.....

The reversing loop, which will be hidden under the upper deck, was about half 11" radius and half 9.75" radius.  The Santa Fe C30 tracked around it with no problems.  The SD40 - it was another issue.  That bad boy WOULD NOT stop derailing on that loop.  I knew that something had to happen so I pulled up the loop and re-installed it, with a little easier curve.  Again - SD40 derailed.  I rebuilt it a total of three times before I finally was able to get the SD40 around, in forward & reverse, at full speed.  I know the locos will never run at full speed but I had to be sure that things would track (pun intended) once the upper deck "lid" was in place.  Here's a view of the loop in question being reworked:
Problem reversing loop with Sheila's school bus and backhoe shown.
In follow up research I learned that 3X a car length should be the minimum radius used & 5X is best.  Now it makes sense, 40' boxcars are 3.25" long.  Use the 3X factor and yu end up with the 9.75" radius.

I know that the 9.75" radius pieces have a place - but in the future, it that place won't be on my layouts!


Living on the Edge - Not Good

Been away for awhile but mostly due to job and work on the layout.  Today's lesson - living on the edge isn't always a good thing ........

I was moving along really well on the servo installations and had the upper deck servo installed and moved on to the areas along the far left side and back of the layout.  This required a little move of some room furniture as well as pulling the layout away from the wall.  Things seemed to be really rocking along until it came to the two servos for the turnouts along the back of the layout.  Atlas had the back track about an inch from the edge of the layout.  I followed suit and felt like I had made good use of all the layout board real estate.I drilled the holes for the turnout actuator wires and was glad they missed the edge framing of the layout ...... or so I thought.

One note about the servos controlling the turnouts.  The servo needs to be perpendicular to track so that when the actuator wire moves from side-to-side, the turnout will likewise move from side to side.  When I started to install the servos, I realized that there wasn't enough clearance for the servo mounting bracket.  I pondered that for a few minutes, looked at options and realized I had no choice - I had to cut clearance holes in the outer edge frame of the layout!!!!!
Ugly I know, but it was a tough job to actually get in here an get the hole cut.
View from under the layout.
So - living on the edge didn't turn out so well. Fortunately, and it's a lame excuse, I'm the only one who knows the ugliness is there.  The back edge is against the wall and will always be, even when the layout moves someday.

Ironically, Living on the Edge is my cellphone ting tone - no joke........